Editor's Note: When I was approached with this idea for a guest post, I jumped at it. How perfect would a stack of these nautical-inspired rope coasters be in a seaside home? Or how fun would they be in a beach-inspired one? Hope you enjoy this DIY post on how to make rope coasters. -SC
Guest Post by Marcelina Hardy
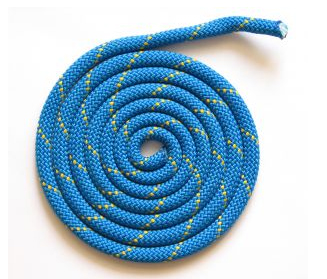
Rope coasters make the perfect nautical accent to any living room or office. You can make them just about any color, and they will not scratch surfaces. Learn how to make your own rope coasters by following these directions.
How to Make Rope Coasters
Supplies:
- Piping cord: Most people use 10m size, but you can use whatever size you would like to use. The thicker the rope, the less rungs you will have in your coaster. It’s all about preference when deciding the size.
- PVA glue: You can buy this supply from your local craft store or from a home improvement store. You’ll need a small tube because it doesn’t take much to glue the rope together.
- Cardboard: Any cardboard is fine to use, as it won’t affect the coaster itself. This just makes making the coaster much easier.
- Tape: You can use regular household tape. This is only to secure the rope together and you’ll be taking it off after the coaster is complete.
- Paper plate
Directions:
- Set up the supplies: Cut 5 pieces of rope at a 2m length. These measurements are to make a standard size coaster. If you want your coaster to be smaller or larger adjust the measurements as needed. Cutting the end at a 45 degree angle will give the coaster a more finished appearance. Pour some PVA glue on a paper plate to use for dabbing the cord into it.
- Next, coil the rope: Dab the end of the rope into the glue, and start to twist it into itself to roll it. The tighter you can make the rolling, the better. Don’t be afraid to unroll and roll again, as the glue will not be able to be seen once it dries.
- Now, secure the coaster with tape: Once the rope is completely rolled, place tape on it to keep it from unraveling. Use as much tape as necessary, so it won’t unravel, or your coaster will end up useless and you’ll have to start all over again. Place to the side to dry.
- Finally, glue the coaster: Pin the coaster onto the cardboard. Unravel until you reach the part that you glued first. Use a paintbrush to brush glue on the inner edge of the rope and re-coil the rope. Glue all of the rope until you are at the end. Set aside to dry.
Now you know how to make rope coasters. They don't take long to make either -- so you can make many at once. Even better? Everyone loves them, so consider making them to entertain with or give them as a gift for Christmas or another event.
Marcelina Hardy is a bride who created these coasters for her wedding, using them underneath vases on the reception tables. Her wedding florist in Meridian, MS was impressed with the way the coasters turned out and now recommends them to brides also looking for ideas for their wedding flowers.
Glad you shared this. VEry nice and artistic. 🙂